Set up a new birth chart (and view it)
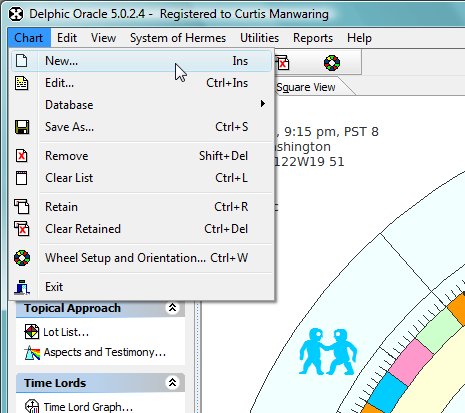
To set up a new birth chart, you can press the Insert key, or go to the menu Chart | New, or...

click on the toolbutton just below the main menu as shown below:

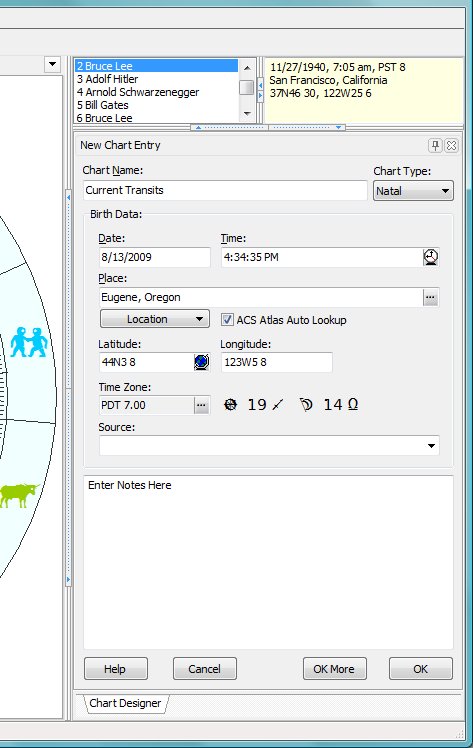
This will bring up the New Chart Entry window to the Dock Tab Area as shown below:

First you will want to type in a name in the Name edit field at the top. The Name edit field has the text "Current Transits" in it by default. This name will show in the chart viewer and in the listboxes in several areas where chart selection is available or necessary for further processing.
Next, press the Tab key (I strongly recommend that you use the Tab key to move between fields because there are events associated with the onExit of these that trigger updates which will save you time on entering data) and it will bring you to the Chart Type drop down combo box. There are 3 types possible here: Event, Natal and Horary. The chart type lets the program know what kinds of processing can be done.
Pressing the Tab key again will bring you to the Date edit field. Depending upon the setting you have for Date Style, the date format will show something like dd.mm.yyyy (where dd stands for a two digit year, mm two digit month, etc) or mm/dd/yyyy. Some regional settings will specify a period (.) as the date separator symbol and some will use commas (.) or forward slashes (/).
Pressing the Tab key again brings you to the Time edit field. The format is usually hh:mm:ss or hh.mm.ss or you can simply press a 7 for the hour and it will interpret 7:00 or 7,00, etc. There is a button attached to the field at right that will enter the current date and time into the date and time edit field.
The Place edit field can be used by the ACS Atlas to look up latitude, longitude and time zone. If you do not want this to happen automatically, then uncheck the ACS Atlas Auto Lookup button below this edit field. Also below this field is the Location drop down button which will either save the location you currently have listed in the edit field as the default location for this window or you can use this button to restore to the previous location if you have since modified the place edit field.
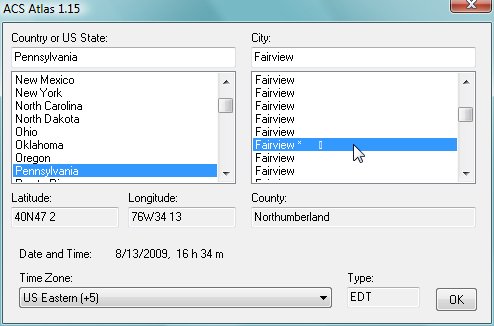
If the ACS Atlas Auto Lookup button is checked, it will search the Atlas automatically when you Tab away from the Place edit field. If search was successful it will load the latitude and longitude in the Latitude and Longitude edit fields below and also calculate the ascendant and midheaven degrees to let you know what the chart angles are to see if you are on track. If there is a city name by the same name such as Fairview, PA (there are about 12 of them), then there will be a red text warning indicating "Duplicates" just above this edit field. In this case you need to press the Ellipsis button attached to the Place edit field to search which of the locations is the correct one. This will bring up the ACS Atlas window directly which will list countries and cities side by side:

Click Ok in the ACS Atlas window to load this location, latitude, longitude into the Place edit field, Latitude, Longitude and Time Zone edit fields respectively.
The Latitude and Longitude edit fields can also be edited directly if you don't have the Atlas. The Globe button attached to the Latitude edit field will bring up the decimal coordinates dialog if you prefer decimal degrees.
Pressing the Tab key after the Longitude edit field brings up the Time Zone edit field. This field is read only, but you can modify it by pressing the Ellipsis button attached to this field.
Below the Time Zone edit field is the Source drop down combo box. This field is for setting the accuracy level of the birth information indicating how accurate the reports of the time are. You can select one of the predefined strings, or you can type in your own explanation.
The last field is a Memo field which allows you to type in the life story if you wish. Anything can be saved in this field for later reference.
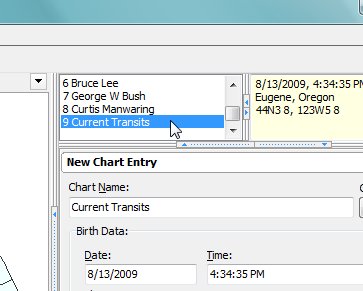
Pressing the OK button will take the data in all the fields of this window and send it to the internal collection of open birth charts. You will see the new chart in the list near the top right of the main window:

The OK More button will leave the window open so you can create more charts. OK will load the chart into the Open Chart List and close this window and Cancel simply closes the window without doing anything.
To view the chart, all you need to do is double click the name of the chart in the list. Alternatively, you can press the Control Key and W at the same time <CTRL + W>, and this will bring up the Wheel Setup Dialog where you can change orientation attributes and view multiple charts at the same time.
